The Foundation to Handspring Success
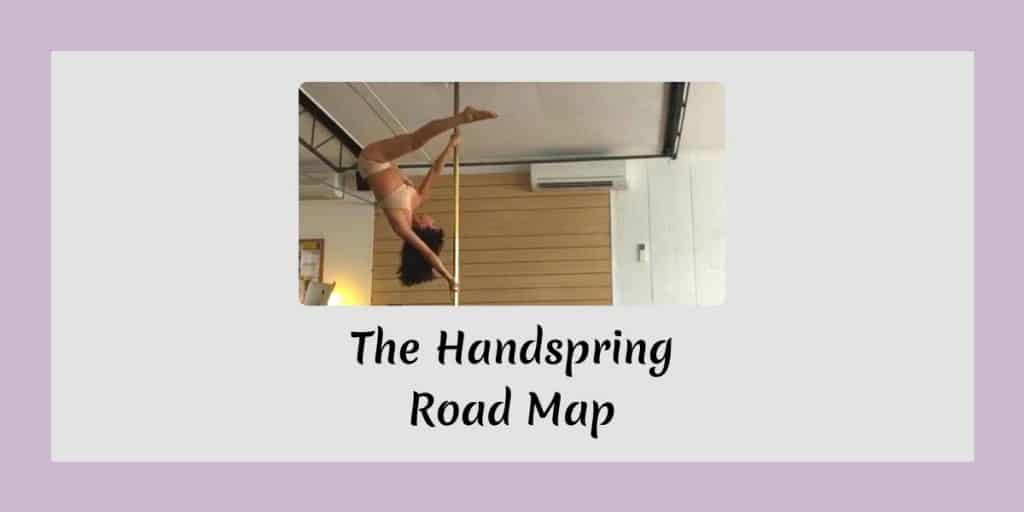
The Handspring, aka Split Grip Ayesha, is a goal trick for a lot of pole dancers. Not only does the Handspring offer a great sense of achievement, it also opens the door to a lot of fun tricks, combos, and transitions. It is certainly one of those rite of passage tricks and many polers are keen to get started on it. But how do you know you’re ready to start Handspring training? Let me show you the road map!
Handspring is a complex pole trick that demands high movement capacity from the poler. What is movement capacity? It is a term I use to describe the sum of your mobility, strength, coordination, body awareness, spatial awareness, skill, endurance, motor control, plus knowledge of the movement. In pole, knowledge of movement means your understanding of the mechanics of the pole trick you’re trying to do: contact points, push-pull levers, weight distribution, order of movement… etc. Handspring is a complex movement that demands a high level of movement capacity from the poler.
Here’re 4 key factors I want to highlight regarding Handspring training. To be able to do a Handspring, you must have:
- Strength – You are essentially doing a handstand whilst holding onto the pole with your hands so you must have similar upper body and core strength.
- Mobility – It is common knowledge nowadays that you need good shoulder mobility for Handspring. However, that is only 1/3 of the equation! You need equally good mobility in your elbow and wrist to do the Handspring. In fact, a lack of wrist mobility is a significant contributing factor to a lot of pole related shoulder pain I’ve treated!
- Body and spatial awareness – This one is critical for any inverted pole tricks. Especially if you, like me, have not had any dance or gymnastic training when you were young and hence have never needed any, let alone developed, body and spatial awareness beyond what’s required to navigate the right-side-up world.
- Knowledge of the movement – Most people start to work on their Handspring by popping up into it from standing. That’s certainly how I was introduced to it! But how on earth are you supposed to do a movement when you have no idea where it is in space? How are you supposed to Handspring from standing when you don’t know where to stop? Without an understanding of the end position you cannot aim and direct your body safely and effectively through space. If you’re too timid, you tend to fall short. If you’re too keen, you’ll overshoot it. Neither are conducive to your success. This is why I believe Handspring training begins from up the pole but more on that later.
The Prerequisite Combo
This road map is for achieving the Standard Grip Handspring, this is the first grip I suggest you learn and you can read all about why in my post “Is Twisty Grip Really Evil?” Now it goes without saying that safety comes first and safety is your responsibility, so instead of me constantly nagging you about getting spotted, I’ll leave that up to your good judgement.
I believe the prerequisite to starting Standard Grip Handspring training is a thoroughly owned Aerial Extended Butterfly via Jamilla.
Wait one sec! What do you mean by own? By owning a pole trick, I mean that you can confidently, independently, safely, and repeatedly execute that trick, hold it for 10 seconds and then exit gracefully. It means that you can pull it out anytime you want without needing Jupiter aligning with Uranus, i.e. the movement is thoroughly in your Safe Zone.
Why is this combo the prerequisite? Because if you own this combo, you are demonstrating to me that you’ve spent a decent amount of time working on climbing, getting into the Jamilla, hooking your outside leg, turning yourself upside down into your Butterfly, holding it, then stretching out into the Extended Butterfly. You’re showing me that you have decent strength, skill, coordination, body and spatial awareness. In other words, you are showing me that you have the movement capacity required to start Handspring training.
About the Butterfly… When I say Butterfly, I mean your body is off the pole Butterfly, NOT where you invert, move your hands into a super wide Split Grip then pose one leg down Pretend Butterfly. I know this sounds harsh but in a Pretend Butterfly you really are just hanging there, the level of strength, coordination, body and spatial awareness required is drastically lower than the real deal. It is a lovely looking shape, though! But if you want to build up your movement capacity for more advanced pole tricks, work on the proper Butterfly.
The Progression
So you own an Aerial Extended Butterfly via Jamilla, what’s next? Before I tell you what’s next, let’s take a moment and talk about your exit. Instead of half jumping-half falling out of your move, work on a variety of proper exits instead. Not only will this help you build strength, it will also help you develop flow, explore more options for transition, and encourage you to create! For example, you can go from your Extended Butterfly into an Inside Leg Hang, the gateway to many other fun things. You could get back onto the pole, slide down and cartwheel off, Shoulder Dismount off, or whatever else tickles your creativity.
Pike
To bridge the gap between Aerial Extended Butterfly and Handspring, the first thing you want to work on is holding a strong Pike. From your Extended Butterfly bring your back leg back towards the pole and put it next to your other leg so your hips are in a piked position. Working on this allows you to build strength and also get used to moving whilst upside down. Aim for a 10 second hold in the piked position and work on a variety of exit. Once you own this you can move onto the next part.
Straddle
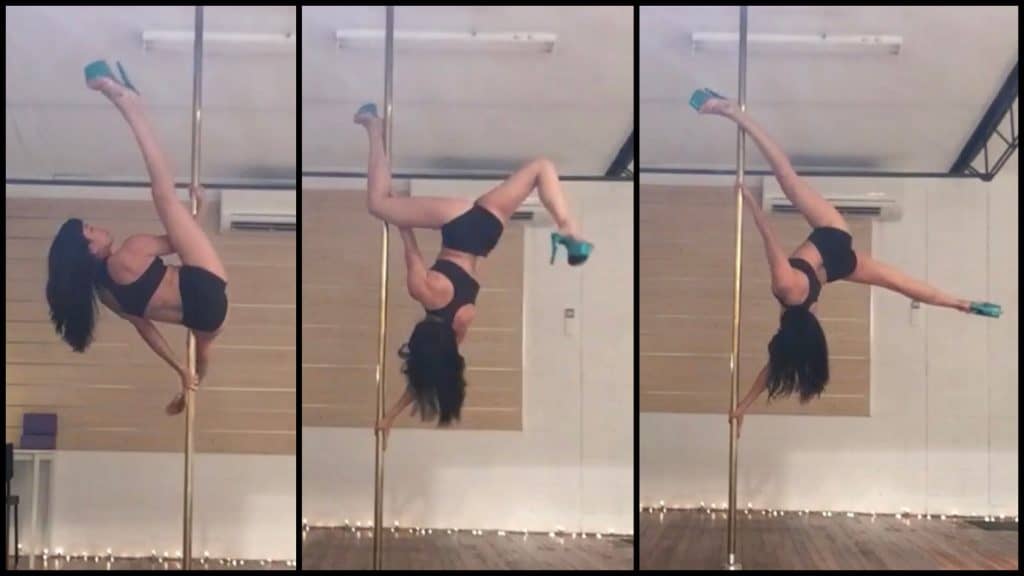
Next, work on slowly piking deeper in preparation for opening up into a Handspring Straddle. How deep you can pike today will be informed by your current back of legs mobility, neural mobility, strength… etc. Working on piking as deeply as you can will help you develop this active flexibility whilst building strength endurance in your shoulders.
Once you own a Deep Pike you can work on opening up into a Handspring Straddle. The key is to move slowly so you can feel the subtlety of the movement and adjust accordingly. I know moving both legs off at the same time slowly sounds scary, but it actually keeps your weight better balanced making it easier to hold. And BOOM! Hello Handspring!! I know I said I won’t nag you about spotting but at this particular point in time I have a sudden compulsion to do so – please use a spotter.
Pencil
When you own a Handspring Straddle the next target is a Pencil. You can put your feet back onto the pole and use it to guide you as you slowly extend your feet up into a Pencil, or you can move your legs straight from your Straddle up into a Pencil. In the interest of expanding your movement options, you should do both. Pencil comes after Straddle because it is harder to balance something narrow.
The Final Pop
Finally, when you own a Handspring Straddle and Pencil, try popping up into it from standing. By now you’d spent quality time improving your movement capacity and more importantly, you’d have better knowledge of the movement! You now know what a Handspring actually is so when you try to pop up into it from standing, you know where you’re going, you know you have the strength to hold it when you get there, and you know when you need to stop.
Here’s a recap of the order of progression for you:
- Aerial Extended Butterfly via Jamilla.
- Pike (Feet at level of Extended Butterfly to deepest possible Pike)
- Straddle
- Pencil
- Pop up from standing
So there you have it, that’s my Handspring Road Map. I hope it has helped simplify the process for you. If you have any questions about it, hit me up in the comments or send me a DM. I also want to see your progress and celebrate your success with you so make sure you tag me in your post!
’Til next time, Be Free In Your Movement™.
x
Selina
B. Phty
This information is not medical advice. Got health concerns? Consult a real-life health professional.
Views are my own.
*Affiliate links. Your choosing to use these goes towards supporting my content creation. Thank you.